Sunday, October 2, 2022

I Believe in Pink Tutorial


I Believe in Pink Tutorial


Think Pink Kit HERE


1. Open psp program go to File new size 700 x 700 transparent image 

2. Open Frame 4 go to Image>Resize 55% then go to Edit>Copy now go to the transparent image go to Edit>Paste into new raster layer with your move tool place it on the upper top left side then go to Layers>Duplicate move the second frame down a little then move the 2nd frame down beneath the left frame

3.  Open Heart Doodle 1 go to Edit>Copy now go top image layers go to Edit>Paste into new raster layer with your move tool adjust the frame the heart doodle together the small heart on the left side will go with the bottom of the frame 

4. Now once you have the frames line up with the heart doodle take the 2 frames erase the frame inside the upper frame then merge the 2 frames together on the same layer

5. Open Heart Doodle 2 go to Edit>Copy now go to the top image layers go to Edit>Paste into new raster layer with your move tool move the pink doodle heart on the top of the hot pink heart doodle but give it a 3rd view look 

6. Go to your Adjust>Brightness and Contrast with this setting below (highlight the pink heart doodle to white) 

Brightness 116

Contrast -4 

click okay 

7. Go to your 3d Effects>Drop Shadow (white heart doodle) add 2 -2 50 3 black click okay (give it depth stand out) 

8. Open Heart Charm go to Image>Resize 55% then go to Edit>Copy go to the top image layers go to Edit>Paste into new raster layer with your move tool place it on the top of the upper frame as shown above 

9. Open Pink Lady bug 1 go to Image>Mirror then go to Image>Resize 25% then go to Edit>Copy now go to the top image layers go to Edit>Paste into new raster layer with your move tool place it on top of the heart charm on the left side as shown above 

10. Open BCA Ribbon 1 go to Image>Resize 45% then go to Edit>Copy go to the top image layers go to Edit>Paste into new raster layer with your move tool place it on the left side (hide the top of the heart charm) 

11. Open Ribbon 4 go to Image>Resize 45% then go to Edit>Copy go to the top image layers go to Edit>Paste into new raster layer with your move tool place the white ribbon on top of the hot pink ribbon give it an 3d view look as shown above 

12. Open the word art I believe in Pink go to Image>Resize 65% then again at 90% then go to Edit>Copy now go to the top image layers go to Edit>Paste into new raster layer with your move tool place the word art into the inner frame line up with the white ribbon as shown above

13. Open Paper 5 add it to your foreground pattern 45 angle, 50 scale click okay then click on your paint brush and go down to the transparent image then paint the pink paper into both the inner frames 

14. Open Cookie Think Pink 2 go to Image>Resize 60% then go to Edit>Copy now go to the top image layers go to Edit>Paste into new raster layer with your move tool place her on the right side of the image as shown above then once in place go to your 3d Effects>Drop Shadow of 0 0 60 15 black click okay 

15. Open Grass go to Edit>Copy now go down beneath the hot pink doodle hearts go to Edit>Paste into new raster layer with your move tool adjust the grass beneath Cookie 

16. Open Monkey 3 go to Image>Resize 45% then go to Edit>Copy now go down beneath Cookie go to Edit>Paste into new raster layer with your move tool place the monkey into the grass by Cookie as shown above once in place add the same drop shadow as before

17. Open Monkey 1 do step 16 this time move it on the edge of the frame in the grass as shown above and add the same drop shadow as before 

18. Open Teddy bear 1 go to Image>Resize 25% then go to Edit>Copy now go to the top image layers go to Edit>Paste into new raster layer with your move tool place it down in front of Cookie hand on the right side as shown above 

19. Open Butterfly 2 go to Image>Resize 25% then go to Image>Free Rotate left 20 click okay then go to Edit>Copy go down beneath Cookie go to Edit>Paste into new raster layer with your move tool place the butterfly into the lower frame as shown above 

20. Open Butterfly 1 go to Image>Resize 20% then go to Image>Free Rotate Right 20 click okay then go to Edit>Copy now go to the top image layers go to Edit>Paste into new raster layer with your move tool place it into the upper frame as shown above 

21. Open Camera 2 go to Image>Resize 20% then go to Edit>Copy now go to the top image layers go to Edit>Paste into new raster layer with your move tool place it front of Cookie boot on the right side as shown above 

22. Open Cup 1 go to Image>Resize 20% then go to Edit>Copy now go down beneath the Camera go to Edit>Paste into new raster layer with your move tool place the cup down by the camera once in place it (line with the boot erase the outside boot on the left side of the cup) 

23. Open Gift 1 go to Image>Resize 20% then go to Edit>Copy now go down beneath Cookie layer go to Edit>Paste into new raster layer with your move tool line the gift box behind the cup then once in place go to your monkey move him up beneath the gift box 

24. Open Cookies with the blank heart (or your choice I use the blank pink heart) go to Image>Resize 20% then go to Edit>Copy now go to the top image layers go to Edit>Paste into new raster layer with your move tool place the cookies in front of the gift box and next to the cup 

25. Go to Layers>Merge>Merge Visible adjust into the transparent image 

26. Add copyright as shown below 

© TinkersBoo
www.PicsForDesign.com

Add tag by (your name with copyright license ) mine is #0520

27. Add your name to the pink heart of the monkey as I did below 

Color #df3073

Font Marriage-Script

I shrink my name into the heart then add 3d Effects>Inner Bevel 

width 25, Image Smoothness 7, Depth 3, Angle 315, Color white, Intensity 50, Elevation 30 everything else is 0 click okay (I did it 2 times gave boldness) 

Then add drop shadow of 1 1 60 1 color #3c3c3c click okay (give it depth)

28. Crop your tag out of the extra transparent image (optional) 

29. Go to File save as PNG Format this completes this tutorial may you enjoy the other tutorials designs to this scrap kit design create by me all materials for the tutorial is include in the kit thanks for stopping by look for new tutorials to arrive soon 

Hugs Tinkers Boo

written Oct 2nd, 2022
Water View Mist Background


 Water View Mist Background

Right click to save it 

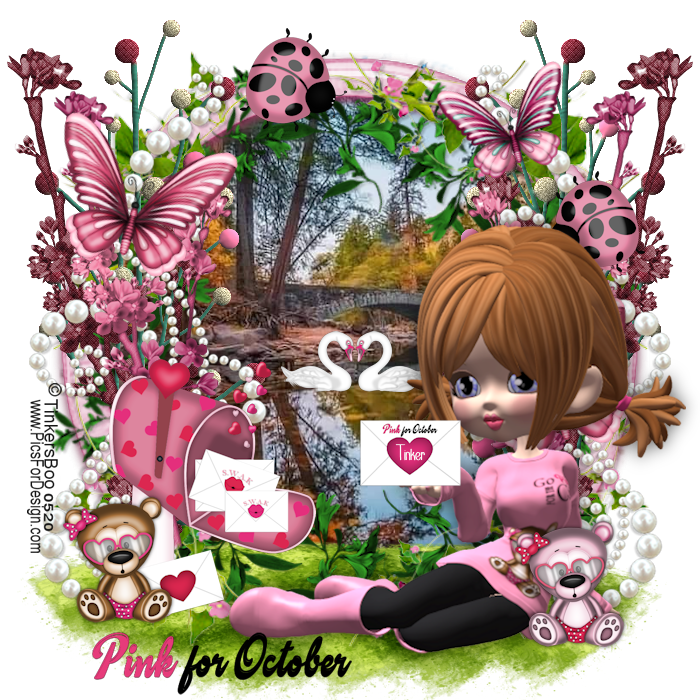
Design with Pink for October Tut HERE

Pink for October Tutorial


Pink for October Tutorial 

 Think Pink Kit HERE


1. Open psp program go to File new size 700 x 700 transparent image 

2. Open Circle Frame 2 go to Edit>Copy then go to the transparent image go to Edit>Paste into new raster layer 

3. Open Circle Vine 2 go to Edit>Copy then go to your image top layer go to Edit>Paste into new raster layer 

4. Open Circle Vine 1 go to Edit>Copy now go to the top images layers go to Edit>Paste into new raster layer (it will fall into place as the rest of the elements have) 

5. Open BCA Doodle go to Edit>Copy now go to the top image layers go to Edit>Paste into new raster layer with your move tool move it on the left side then once in place as you like go to Layers>Duplicate then go to Image>Mirror then go to Layers>Merge>Merge Down then take your eraser and erase the bottom of the stem as I did the following above (but can't really see it much.. use your best judgement) 

6. Open BCA Vine 2 go to Edit>Copy now to go images go top image layers go to Edit>Paste into new raster layer this time place it on top of the left side of the BCA Doodle then take your eraser and erase the vine on the bottom where the green leaves are at then go to Layers>Duplicate then go to Image>Mirror then go to Layers>Merge>Merge Down 

7. Open BCA Vine 1 go to Image>Resize 80% then go to Edit>Copy then go to the top image layers go to Edit>Paste into new raster layer with your move tool adjust it on the left side (erase the bottom a little) then go to Layers>Duplicate Image>Mirror then go to Layers>Merge>Merge Down 

8.  Open Pearls Vine go to Image>Resize 80% then go to Edit>Copy now go between the BCA Vine 2 and 1 go to Edit>Paste into new raster layer with your move tool adjust it on the left side then once in place go to Layers>Duplicate Image>Mirror then go to Layers>Merge>Merge Down 

9.Open Butterfly 2 go to Image>Resize 35% then go to Image>Free Rotate Right 15 click okay then go to Edit>Copy now go to the top image layers go to Edit>Paste into new raster layer with your move tool place the pink butterfly on the left side (as shown above) then go to Layers>Duplicate with your move tool place it on the right side as shown above 

10. Open Butterfly 1 go to Image>Resize 25% then go to Image>Free Rotate Left 15 click okay then go to Edit>Copy then go to the top image layers go to Edit>Paste into new raster layer with your move tool place it on the upper right side as shown above 

11. Open Pink Lady Bug 2 go to Image>Resize 20% then go to Edit>Copy now go to the top image layers go to Edit>Paste into new raster layer with your move tool place the pink lady bug on the right side between the butterflies as shown above then go to Layers>Duplicate, Image>Mirror and place it on the upper top of the frame as shown above 

12. Open the Grass go to Edit>Copy now go down to the Circle Frame go to Edit>Paste into new raster layer with your move tool place it down on the bottom of the frame the vine and the pearls will show on the grass 

13. Take your eraser go the Pearls doodle layer then erase the pearls on the grass so the vines will show on the grass in the center of it 

14. Open Mailbox go to Image>Resize 45% then go to Edit>Copy now go to the top image layers go to Edit>Paste into new raster layer with your move tool place the mailbox on the left side as shown above once in place use your tool push brush and push up a little on the bottom of the mailbox it blends with the grass 

15. Open Cookie Go Cure 3 go to Image>Resize 70% then again at 80% then go to Edit>Copy now go top image layers go to Edit>Paste into new raster layer with your move tool place her on the right side of the frame and into the grass as shown above then go to your 3d Effects>Drop Shadow of 0 0 60 25 black click okay (gives it depth) 

16. Open Teddy bear 2 go to Image>Resize 25% then go to Edit>Copy now go to the top image layers go to Edit>Paste into new raster layer with your move tool place the brown teddy bear on top of the mailbox as shown above 

17. Open Teddy bear 3 go to Image>Resize 25% then go to Edit>Copy then go to the top image layers go to Edit>Paste into new raster layer with your move tool move the pink teddy bear in front of Cookie hand on the right side 

18. Go to both Teddy bear layers add the drop shadow of 0 0 70 5 black click okay 

19. Open Pink for October word art go to Windows>Duplicate the go to Image>Resize 55% (set it aside) 

20. Open Envelope Heart 2 go to Windows>Duplicate, then take the smaller word art go to Edit>Copy then go to the image of the envelope heart go to Edit>Paste into new raster layer with your move tool place the word art Pink for October on the top of the envelope then go to Layers>Merge>Merge Visible then go to Image>Resize 25% then go to Edit>Copy now go to the top image layers go to Edit>Paste into new raster layer with your move tool place the envelope into Cookie hand as shown above 

21. Take the word art Pink for October go to Image>Resize 65% then go to Edit>Copy go to the top image layers go to Edit>Paste into new raster layer with your move tool place the word art down on the lower part of the grass underneath the Teddy bear, mailbox and cookie as shown above 

22. Right Click my Background mist for this tutorial 


open it into your psp program go to Edit>Copy then go down to the transparent image go to Edit>Paste into new raster layer (leave it as is) it will fall into place 

23. Open Swans go to Image>Resize 25% then go to Edit>Copy then go to the background mist go to Edit>Paste into new raster layer with your move tool place them into the water (one sit in the water other on land) take your push tool an do small size on the bottom of the swan blending them into the mist background 

24. Go to Top image layers go to Layers>Merge>Merge Visible

25. Add copyright as shown below 

© TinkersBoo
www.PicsForDesign.com

add tag by (your name) with your copyright license mine is #0520 

26. Add your name to the image tag as I did the following below 

Color white

Font LittleMissPriss

I shrink my name into the pink heart of the envelope Cookie is holding in her hand 

27. Go to Layers>Merge>Merge Visible 

28. Go to File save as PNG format this completes the tutorial to Pink for October for Awareness Cancer look for other designs to come under Tuts_Awareness thanks for purchasing the scrap kit all materials are provide for you including the poser tube thanks for stopping by we hope to see you soon again 


Hugs Tinkers Boo 

written Oct 2, 2022

Monday, July 4, 2022

Stars & Strips USA Tutorial


Need Supplies 

4th July Kit HERE
PSP Tube Julia  HERE (by ) 


Stars & Strips USA Tutorial 


1. Go to File new size 700 x 700 transparent image 

2. Right click the template below open it into your psp program go to Image>Resize 600 pixels height click okay then go to Edit>Copy then go to the transparent image go to Edit>Paste into new raster layer 

3. Open Stars & Strips Banner 2 (or 1 your choice) go to Image>Resize width 600 pixels click okay then go to Edit>Copy now go to the top image layers go to Edit>Paste into new raster layer with your move tool place it down on the bottom rectangle template (it will hide it) 

4. Open Paper 9 add it to your foreground pattern 45 angle, 50 scale and Open Paper 5 add it to your background pattern 0 angle, 100 scale click okay 

 4a. Go to black template go to Selections>Select all>Float go to Layers>Add new raster layer with your paint can paint the strip paper into the marching ants go to your Selections>Select all>Modify>Contrast 25 click okay then go to Layers>Add new raster layer move the new raster layer above the strips paper layer then switch the foreground and background pattern around click on your paint can and paint the blue gradient paper into the marching ants then go to 3d Effects>Drop Shadow of 2 2 50 2 black click okay then again at -2 -2 50 2 black click okay then go to Selections>Select None close the papers out 

5. Open USA Word art go to Image>Resize 300 height pixels click okay then go to Edit>Copy now go to the top image layers go to Edit>Paste into new raster layer with your move tool move the USA word art on the left side of the image as shown above (it will fit into place)

6. Open Award 2 go to Image>Resize 45% then go to Edit>Copy now go to the top image layers go to Edit>Paste into new raster layer with your move tool place it on the upper top right corner as shown above 

7. Open psp tube of Julia and design her as I did above or your choice once done go to Layers>Merge>Merge Visible then go to Edit>Copy then go to Edit>Paste into Image then close the original out click no then go to the image go to Image>Resize height 500 pixels click okay now go to Edit>Copy now go down beneath the banner stars and strips go to Edit>Paste into new raster layer with your move tool move her as adjust into the image on the right side then once in place go to Layers>Duplicate move the duplicate to the top of your images layers then take your eraser and erase the bottom part of her that showing on the banner 

8. Go down to the girl beneath the banner and go to your 3d Effects>Drop Shadow of 0 0 60 25 black click okay (give it depth) 

9. Open Banner 1 go to Image>Resize width 500 pixels click okay then go to Edit>Copy now go down beneath the award banner and go to Edit>Paste into new raster layer with your move tool place the banner on the top of the image once in place erase the right side of the banner showing on the transparent image of the right side of the award banner 

10. Open Corner 1 go to Image>Resize 45% then go to Edit>Copy now go to your images go to Edit>Paste into new raster layer with your move tool move the rose corner on the top left side of the banner 

11. Open Rose Floral 2 go to Image>Resize 35% then go to Image>Free Rotate Right 10 click okay now go to Edit>Copy now go to the top image layers go to Edit>Paste into new raster layer with your move tool place the flower on top of her hand then take your small eraser and tab the stem on her thumb and her hand making her look as if she is holding the flower too 

12. Open Rose Floral 3 do step 11 again but go behind the red rose 

13. Open Rose Floral 1 go to Image>Resize 35% then go to Edit>Copy now go to the top image layers go to Edit>Paste into new raster layer with your move tool this time place the blue flower on top of the red and white flower then once in place erase the stem on her hand and erase the leaves on the blue flower

14. Open RWB Firework go to Windows>Duplicate 

  14a. Take the first one and go to Edit>Copy now go down to the strip paper go to Edit>Paste into new raster layer with your move tool adjust the fireworks on the left side once happy move the fireworks down to the black template so it shows behind the elements as shown above 

 14b. Take the firecracker element 2 go to Image>Resize 45% then go to Edit>Copy now go down to the blue paper, Close off both girl tubes then go to Edit>Paste into new raster layer with your move tool place the firecracker on the top then go to Layers>Duplicate Image>Mirror and adjust it on the bottom then open both girl tubes and adjust the firecrackers with her 

15. Go to the top image layers go to Layers>Merge>Merge Visible 

16. Add copyright as shown below 

© Alehandra_Vanhek
www.PicsForDesign.com

Add copyright license as mine is #0520 

17. Add your name as I did the following below 

Font LainieDaySH

Color I use Paper 5 0 angle, 100 scale

18. Go to Layers>Merge>Merge Visible 

19. Go to File save as PNG Format this completes the tutorial may you enjoy your stay and thanks for doing our tutorials and thank you for purchasing our designs at Pics for Designs 

Hugs Tinkers Boo 

written July 4th, 2022

Home of the Brave Tutorial


Need Supplies 

4th July Kit HERE


Home of the Brave Tutorial 

1. Go to File new size 700 x 700 transparent image 

2. Right Click the templates below 


Take the Circle go to Image>Resize 500 height pixels click okay then go to Edit>Copy then go to the transparent image then go to Edit>Paste into new raster layer move it up a little. Then take the heart go to Image>Negative (turn it white) go to Edit>Copy now go to the top image layers go to Edit>Paste into new raster layer with your move tool place it on the left side 

3. Open Papers 3, 4, 5, 6 on Paper 3 & 4 you will add it as 45 angle, 50 scale the other papers you will use as 0 angle, 100 scale in your foreground pattern 

 3a. Do the blue stars and the blue paper 1st go to Selections>Select all>Float then go to Layers>Add new raster layer click on your paint can and paint the blue star paper into the marching ants then go to Selections>Select All>Modify>Contrast 25 click okay then go to Layers>Add new raster layer (with your move tool place the transparent above the blue star paper then change the foreground pattern to the blue gradient paper then click your paint can and paint the blue gradient into the marching ants then go to your 3d Effects>Drop Shadow of 2 2 50 2 black click okay then again at -2 -2 50 2 black click okay then go to Selections>Select None 

 3b. Do the red stars and the red gradient paper to the heart this time you change the Contrast to 15 add the same drop shadow to it 

4. Open Home of the Brave word art go to Image>Resize 65% then go to Edit>Copy go to the top of the image layers go to Edit>Paste into new raster layer with your move tool place the word art on top of the red heart gradient paper then go to Layers>Duplicate, go to Image>Negative (turn it white) then move it over a little giving it a 3d view 

5. Open American Flag 2 go to Edit>Copy now go down to the white heart template go to Edit>Paste into new raster layer with your move tool place it into the inner blue circle 

6. Open American Flag 1 go to Image>Resize 500 height pixels click okay then go to Edit>Copy now go to your images layers go to Edit>Paste into new raster layer with your move tool place it on top of the 1st flag we it will overlap with one another 

7.Open Flower Lamp 1 go to Edit>Copy now go to your images go to Edit>Paste into new raster layer with your move tool place the lamp on to of the flags as shown above once in place take your eraser and erase the green stem beneath the heart 

8. Open Flower 2 go to Windows>Duplicate two times then close the original out 

 8a. Take one of the flowers go to Image>Resize 40% then go to Edit>Copy now go to the top image layers go to Edit>Paste into new raster layer with your move tool place it on top of the flower lamp (it will fit into place) 

 8b. Take the other Flower go to Image>Mirror then go to Image>Resize 45% then go to Edit>Copy then go to the top of the image layers go to Edit>Paste into new raster layer with your move tool place the flowers on top of the right side of the heart then once in place go to Layers>Duplicate with your move tool move the duplicate flowers on top of the blue circle as shown above 

9. Open Eagle 1 go to Image>Mirror then go to Image>Resize 45% then go to Edit>Copy now go to the top image layers go to Edit>Paste into new raster layer with your move tool place the eagle on top of the flowers as shown above

10. Open Cookie Patriotic 1 go to Image>Resize 70% then go to Edit>Copy now go to the top image layers go to Edit>Paste into new raster layer with your move tool place Cookie down on the right 

11. Open Eagle 2 go to Image>Resize 45% then go to Edit>Copy now go to the top image layers go to Edit>Paste into new raster layer with your move tool place the eagle in Cookie hand 

12. Close off Cookie open the Fence go to Image>Resize 70% then go to Edit>Copy now go down to the flower lamp go to Edit>Paste into new raster layer with your move tool place the fence down on the blue circle then re open Cookie 

13.Open Puppy 2 go to Image>Resize 30% then go Image>Mirror to Edit>Copy then go to the top image layers go to Edit>Paste into new raster layer with your move tool place the puppy on the right side (cover her hand)

14. Open Puppy 3 go to Image>Resize 35% then go to Edit>Copy now go to the top image layers go to Edit>Paste into new raster layer with your move tool place the puppy down in front of Cookie feet and legs once in place take your eraser and erase the foot of Cookie on the red heart 

15. Open Rose Bud 3 (white) go to Image>Resize 25% then go to Edit>Copy now go down to the red heart paper layer then go to Edit>Paste into new raster layer with your move tool place it behind the puppy 

16. Open Rose Bud 1 (red) go to Image>Resize 25% then go to Edit>Copy now go to your images go to Edit>Paste into new raster layer with your move tool place the red rose bud on top of the white one behind the puppy as shown above (keep the element open) 

17. Open Rose Bud 2 (blue) go to Image>Resize 25% then go to Edit>Copy then go to your images go to Edit>Paste into new raster layer with this place the blue rose bud next to the red one as shown above (keep the element open)

18. Close off Cookie and the flower on the right side of the heart layers 

19. Take the red rose bud go to Edit>Copy now go down to the fence and go to Edit>Paste into new raster layer with your move tool place the red rose down on the fence 

20. Take the blue rose bud do step 19 again this time place it next to the red rose bud on the fence 

21. Open Flower and Cookie image and then adjust the rose behind cookie with the fence 

22. Open Grass go to Image>Resize width 500 pixels click okay then go to Edit>Copy now go down to the fence layer go to Edit>Paste into new raster layer with your move tool place the grass beneath Cookie and the puppy doggies 

23. Go to the top image layers go to Layers>Merge>Merge Visible and adjust the image tag into the transparent image

24. Add copyright as shown below 

© TinkersBoo
www.PicsForDesign.com

Add your copyright license mine is #0520 

25. Add your name as I did the following below 

Font Some Weatz Swashes

Color #ffffff

26. Go to Layers>Merge>Merge Visible 

This completes this tutorial and look for other patriotic tutorials with this scrap kit and thanks for purchasing all designs are include in the kit for you thanks for stopping by and Happy 4th of July

Hugs Tinkers Boo 

written July 4th, 2022

Happy Birthday America! Tutorial


 Need Supplies 

4th of July Kit HERE


Happy Birthday America! Tutorial 

1. Open your psp program go to File new size 700 x 700 transparent image 

2. Right Click both templates below 


3. Take the Circle go to Edit>Copy then go the transparent image go to Edit>Paste into new raster layer with your move tool place it up a little to the top (just in case the size changes on your like it did me go to your template go to Image>Resize height 500 pixels click okay)

4. Take the heart go to Edit>Copy then go above the circle template go to Edit>Paste into new raster layer with your move tool place the heart down on the bottom left side as shown above (then go to Image>Negative turn it white so you can see if from the black circle template)

5. Open the word art Happy Birthday America! go to Image>Resize 65% then go to Edit>Copy now go to the top of the image layers go to Edit>Paste into new raster layer with your move tool careful grab the word art and move it into the white heart 

6. Open Paper 3 add it to your foreground pattern 45 angle, 50 scale click okay then Open Paper 5 add it to your background pattern 0 angle, 100 scale 

 6a. Go to the black circle template go to Selections>Select all>Float then go to Layers>Add new raster layer with your paint can paint the blue star paper into the marching ants (keep the marching ants going) then go to Selections>Select all>Modify>Contrast 25 click okay then go to Layers>Add new raster layer move that transparent layer above the blue star paper then switch the foreground and background pattern around click on your paint can and paint the blue gradient paper into the marching ants (keep them going) go to your 3d Effects>Drop Shadow of 2 2 50 2 black click okay then again at -2 -2 50 2 black click okay then go to Selections>Select None. Close both papers done with that. 

7. Open Paper 4 add it to your foreground pattern 45 angle, 50 scale click okay then Open Paper 6 add it to your background pattern 0 angle, 100 scale click okay 

 7a. Do the same thing you did with your circle but with your heart only this time change the Contrast to 15 and add the same drop shadow again to the heart 

8. Then go the word art go to Layers>Duplicate then go to Image>Negative then with your move tool grab the white word art and move it over a little making it look like 3d view 

9. Open Gift box 1 go to Image>Resize height 600 pixels click okay then go to Edit>Copy go to the top image layers go to Edit>Paste into new raster layer with your move tool place it on the right side as shown above

10. Open Gift box 4 go to Image>Resize 45% then go to Edit>Copy now go to the top image layers go to Edit>Paste into new raster layer with your move tool place the red gift box down in front of the presents of gifts 

11. Open Gift box 3 go to Image>Resize 35% then go to Edit>Copy now go to the top image layers go to Edit>Paste into new raster layer with your move tool move the blue box on top of the red box as shown above 

12. Open Balloons go to Image>Resize 70% then go to Edit>Copy now go down to the white heart template go to Edit>Paste into new raster layer with your move tool place the balloons on the left side above the heart a little as shown above 

13. Open Liberty of Cookie Stand go to Image>Resize 500 height pixels click okay now go to Edit>Copy now go down to the blue gradient paper layer go to Edit>Paste into new raster layer with your move tool place her in the middle of the balloons and gift boxes 

14. Open American Flag go to Image>Resize 500 height pixels click okay now then go to Edit>Copy go down to the blue circle paper go to Edit>Paste into new raster layer with your move tool move the flag behind Liberty and hide the yellow pole with the balloons and the heart 

15. Open Cookie Patriotic 1 go to Image>Resize 65% then go to Edit>Copy now go to the top image layers go to Edit>Paste into new raster layer with your move tool place her down in front of the gift boxes 

16. Take the blue gift box and move it a little over as shown above (I move it) 

17. Open Puppy 3 go to Image>Resize 35% then go to Edit>Copy now go to the top image layers go to Edit>Paste into new raster layer with your move tool move the red rose puppy down in front of her shoes as shown above 

18. Open Puppy 2 go to Image>Mirror then go to Image>Resize 35% then go to Edit>Copy then go to the top image layers go to Edit>Paste into new raster layer with your move tool place the second puppy as shown above 

19. Open Cake 2 go to Image>Resize 25% then go to Edit>Copy now go beneath Cookie Patriotic and go to Edit>Paste into new raster layer with your move tool slide the plate up next to the gift box on the right side as if it is next to her 

20. Open Blowpipe 1 or 2 (I use 1) go to Image>Resize 25% then go to Edit>Copy go to your images go to Edit>Paste into new raster layer with your move tool move the blowpipe into Cookie right hand it will line up with her hands and the cake as shown above 

21. Open Camera 2 (or 1 I use 2) go to Image>Resize 25% then go to Edit>Copy now go above Cookie and go to Edit>Paste into new raster layer with your move tool place the camera between the puppy (it will cover her legs) 

22. Open firecracker 2 go to Image>Resize 15% then go to Edit>Copy now go to the top image layers go to Edit>Paste into new raster layer with your move tool place the blue firecracker in Cookie hand once in place erase the sparkle on the end 

23. Open Firecracker 1 go to Image>Mirror then go to Image>Resize 15% then go to Edit>Copy go to the top image layers go to Edit>Paste into new raster layer with your move tool slide the red firecracker into cookie hand on top of the blue one once in place erase the sparkle on that one too 

24. Open All 3 Cherry Bombs go to Image>Resize 15% each then take the white, blue, then red in this row or as you choose go to Edit>Copy go to the blue present gift box go to Edit>Paste into new raster layer with your move tool place the cherry bombs on top of the present as shown above 

25. Open Bow 1 (or your choice) Go to Image>Resize 25% then go to Edit>Copy now go down to the red gradient heart paper and go to Edit>Paste into new raster layer with your move tool slide the bow down on top of the heart as shown above 

26. Go to the top image layers go to Layers>Merge>Merge Visible and adjust the tag into your transparent image so nothing gets cut off 

27. Open RWB Fireworks go to Edit>Copy now go to your image tag go to Edit>Paste into new raster layer with your move tool place it down on the bottom of the tag then go to Layers>Duplicate, Image>Mirror then move the duplicate down by the left side of the heart 

28. Add the copyright as shown below 

© TinkersBoo
www.PicsForDesign.com

Add copyright license as mine is #0520

29. Add your name if you wish as I use the following below 

Font Signature of the Ancient

Color black

30. Go to Layers>Merge>Merge Visible 

This completes this tutorial look for other tutorials design with this scrap kit under Patriotic tuts and thanks for stopping by and thank you for purchasing the kit all is inside the kit for this tutorial design 

Hugs Tinkers Boo

written July 4th, 2022 


Land of the Free Tutorial


Need Supplies 

4th of July Kit HERE
PSP Tube Michelle  HERE (by© Avroraart8 )

Land of the Free Tutorial 


1. Open psp program go to File new size 700 x 700 transparent image 

2. Open Frame 1 go to Edit>Copy now go to the transparent image go to Edit>Paste into new raster layer with your move tool place it on left side move up a little 

3. Open Frame 4 go to Image>Resize 50% then go to Image>Free Rotate Left 25 click okay then go to Edit>Copy go to the top image layers go to Edit>Paste into new raster layer with your move tool place it on the right side of the frame on the top then go to Layers>Duplicate, Image>Mirror and move the bottom blue frame on the bottom line the two together 

4. Open Frame 3 go to Image>Resize 50% then go to Edit>Copy then go to the top image layers go to Edit>Paste into new raster layer with your move tool place it into the center of the two blue frames 

5. Open the word art Red White Blue go to Image>Resize 90% then go to Edit>Copy now go down to the transparent image go to Edit>Paste into new raster layer with your move tool place the word art down into the inner frame of 1 

6. Open the word art Land of the Free go to Image>Resize 70% then go to Edit>Copy now go to the top of your image layers go to Edit>Paste into new raster layer with your move tool place the word art down on the bottom inner frame as shown above

7. Open Paper 6 add it to your foreground pattern 0 angle 100 scale click okay now go down beneath the red frame go to Layers>Add new raster layer with your paint brush paint the red into the inner of the frame that red with the stars

8. Open Paper 5 add it to your foreground pattern 0 angle, 100 scale click okay now go down to the bottom of the two blue frames go to Layers>Add new raster layer click on your paint brush and paint the blue paper in the inner blue frame on the top 

9. Add the solid white into your foreground colors then click on your paint brush and in the same layer paint the white solid color into the lower blue frame 

10. Add this solid color #093c7b blue and solid color #b70225 red then go to your gradient go to the 4th with the setting of 0 angle, 45 repeats click okay now go down to the bottom of your transparent image then click on your paint brush and paint it into the inner frame of the strips 

11. Go to the strips gradient paper we paint go to Selections>Select all>Float then go to Layers>Add new raster layer add the solid white into your ground click on your paint can and paint the white into the marching ants then go to Selections>Select None then go down to the white paper layer and change the transparent image to 38 

12. Open Corner 2 go to Image>Resize 65% then go to Edit>Copy go to the top image layers go to Edit>Paste into new raster layer with your move tool place the floral corner on the top left side of the large frame 

13. Open Corner 3 go to Image>Mirror then go to Image>Resize 35% then go to Edit>Copy now go to the top image layers go to Edit>Paste into new raster layer with your move tool place the floral corner on top of the red frame 

14. Open American Flag go to Image>Resize 45% then go to Edit>Copy now go to the blue paper go to Edit>Paste into new raster layer with your move tool slide the flag into the upper top blue frame as shown above 

15. Open psp tube of Michelle and the cupcake 1 take the cupcake go to Image>Resize 55% then go to Edit>Copy go down to where the strawberry are then go to Edit>Paste into new raster layer with your move tool place the cupcake into her hand then go to the cupcake transparent lower it then use your eraser tool to erase it off her hand then once down place the cupcake back to 100 % on the transparent image then design her as I did above or as you wish then go to Layers>Merge>Merge Visible then go to Edit>Copy Edit>Paste into Image close the original click no then go to the Image go to Image>Resize height 500 pixels click okay then go to step 16

16. Take the Girl go to Edit>Copy now go to the top image layers go to Edit>Paste into new raster layer with your move tool place her on the left side (adjust the word art of the red white blue) keep the girl tube open 

17. Go to the tube go to Image>Mirror now go to Edit>Copy go down to the red paper go to Edit>Paste into new raster layer with your move tool place her head into the inner red frame then erase the rest of her parts outside of the frame then go to girl head go to Layers>Overlay then Hard light 

18. Open Banner 1 go to Image>Resize 65% then go to Edit>Copy now go down to the strip frame go to Edit>Paste into new raster layer with your move tool slide it on the bottom of the frame now take your eraser and erase the banner on the right side then move it down to the transparent image little an continue to erase the right side then adjust it on the lower frame behind the girl (if need erase anything on the right side)

19. Open Blowpipe 2 go to Image>Resize 35% then go to Edit>Copy go to the top image layers go to Edit>Paste into new raster layer with your move tool place the blowpipe up by her knees as shown above 

20. Go to the top image layers go to Layers>Merge>Merge Visible adjust the image tag in your transparent image

21. Add copyright as shown below 

© Avroraart8
www.PicsForDesign.com 

Copyright license as mine is #0520

22. Add your name as I did the following below 

Font Signature of the Ancient 

Color black 

23. Go to Layers>Merge>Merge Visible 

24. Go to File save as PNG Format this completes this tutorial may you enjoy the design and look for other Patriotic tags tutorials to come soon 

Hugs Tinkers Boo

written July 4th, 2022