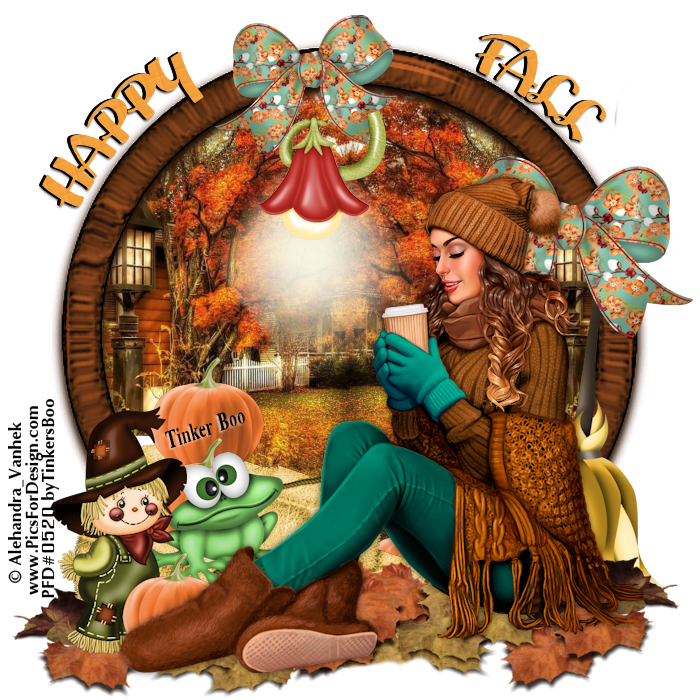
Happy Fall Tutorial
Supplies Need
Paint Shop Program
Background HERE (Facebook Group)
Baker Frame Clusters HERE
Autumn Days Kit HERE
PSP Tube HERE (by © Alehandra_Vanhek)
1. Open File go to File new size 700 x 700 transparent image
2. Open Scarecrow Frame Cluster go to Edit>Copy now go to the transparent image go to Edit>Paste into new raster layer
3. Go to File new size 700 x 700 transparent image now open the background go to Edit>Copy go to the new transparent image go to Edit>Paste into new raster layer with your move tool move the background over to the left side then go to Layers>Duplicate, Image>Mirror line the background edges together once happy go to Layers>Merge Down now go to Edit>Copy (now go to step 4)
4. Click on your magic wand click inside the frame cluster then go to Selections>Select all>Modify>Expand 25 click okay then go to new transparent image beneath the frame cluster go to Edit>Paste into Selection then once in place with the background image go to Selections>Select None
5. Open PSP Tube design her once please go to Layers>Merge>Merge Visible (close the dog out unless add to your image) go to Edit>Copy Edit>Paste into new Image now go to Image>Resize height 500 pixels click okay then go to Edit>Copy now go to the top image layers go to Edit>Paste into new raster layer with your move tool place it on the right side as shown above
6. Go to the psp tube layer go to your 3d Effects>Drop Shadow 0 0 60 10 black click okay
7. Go into your Autumn Days kit go to Leaves go to Edit>Copy now go down beneath the psp tube go to Edit>Paste into new raster layer with your move tool place the leaves underneath the leaves now once in place eraser the leaves on the scarecrow hay area (keep the element open)
8. Go to the leaves element go to Image>Mirror now go Edit>Copy now go down beneath the frame cluster go to Edit>Paste into new raster layer close off the psp tube girl adjust the leaves then reopen the girl slide the leaves a little down as shown above
9. Open Broom go to Image>Mirror now go down beneath the frame cluster an go to Edit>Paste into new raster layer with your move tool place it behind psp tube girl once in place go to Layers>Duplicate with your mouse move the duplicate above the frame cluster now close that element off eraser the broom top on the broom underneath the frame cluster then open the close element and erase the top of the broom as shown above
10. Open Bow 2 go to Image>Resize 45% now go to Edit>Copy now go above the frame cluster go to Edit>Paste into new raster layer with your move tool place the bow on top of the broom on the frame cluster as shown above
11. Open Flower lamp 2 go to Edit>Copy now go above the frame cluster go to Edit>Paste into new raster layer once in place go to Layers>Duplicate with your mouse move the duplicate down beneath the frame cluster now take your eraser and erase top and the bottom of the green leaf of the flower lamp as shown above once both layers are erase as need go to the bottom flower lamp layer beneath the frame cluster go to your soft lift
12. Open Bow 2 again this time go to Image>Resize 35% now go to Edit>Copy now go to the top image layers go to Edit>Paste into new raster layer with your move tool place the bow on top of the flower lamp as shown above
13. Right click the word art below I create for this tutorial
then open it into your psp program go to Edit>Copy now go to the top image layers go to Edit>Paste into new raster layer it will lay on top of the frame cluster as shown above
14. Open Paper 3 add it to your pattern angle 25 scale 45 click okay now go down to the word art go to Selections>Select All>Float now go to Layers>Add new raster layer click on your paint can and paint the orange paper into the new raster layer once paint go to Selections>Select None
15. With your move tool move the orange word art a little so you see the black work art gives it a depth view once in place to go to your 3d Effects>Drop Shadow of 2 -2 70 3 black click okay
16. Go to the top image layers go to Layers>Merge>Merge Visible
17. Add copyright as shown below
© Alehandra_Vanhek
www.PicsForDesign.com
Add copyright license as mine is # 0520
18. Add your name if you wish your choice of font
19. Go to Layers>Merge>Merge Visible
20. Go to File save as PNG Format this completes this tutorial
Hugs Tinker Boo
written Sept 10th, 2021


No comments:
Post a Comment