
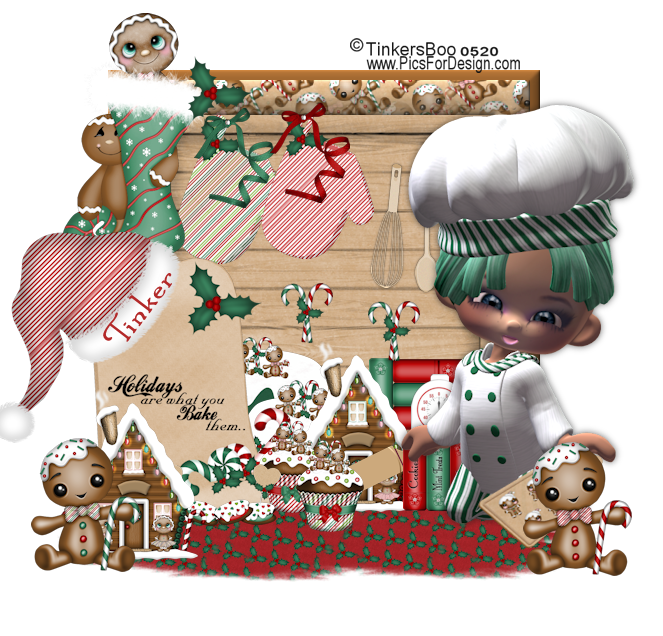
Holidays are what you Bake Them Tutorial
Need Supplies
Gingerbread Kit HERE
1. Open psp program go to File new size 700 x 700 transparent image
2. Open Frame 3 go to Edit>Copy now go to the transparent image go to Edit>Paste into new raster layer
3. Open Shelf Box 1 go to Image>Resize 70% now go to Edit>Copy go down beneath the frame go to Edit>Paste into new raster layer it move it into the frame (move them both up a little)
4. Open Mitten 1 & 2 go to Image>Resize 25% now go to Edit>Copy go to your image (want be on the shelf box) go to Edit>Paste into new raster layer move them up on the shelf as shown above as if they are hanging on it
5. Open Stroll 1 or 2 I use 1, go to Windows>Duplicate close the original then open the word art Holidays are what you bake them go to Image>Resize 65% now go to Edit>Copy now go to the scroll go to Edit>Paste into new raster layer with your move tool adjust the word art into the scroll then go to Layers>Merge>Merge Visible then go to Image>Resize 70% now go to Edit>Copy now go to the top image layers go to Edit>Paste into new raster layer with your move tool place it on the left side of the frame as shown above
6. Open Whisk go to Image>Flip (vertical) then go to Image>Resize 25% now go to Edit>Copy go down beneath the frame go to Edit>Paste into new raster layer with your move tool place it on the shelf as if it is hanging up once in place go to your 3d Effects>Drop Shadow of 0 0 60 3 black click okay
7. Open Wooden Spoon do step 6 again add it next to the whisk
8. Open Gumdrop Mint 2 go to Image>Resize 70% now go to Edit>Copy now go to the top image layers go to Edit>Paste into new raster layer with your move tool place gumdrop on the right side once in place go to your 3d Effects>Drop Shadow of 0 0 60 10 black click okay
9. Open Cake 1 go to Image>Resize 25% then go to Edit>Copy now go down to the frame go to Edit>Paste into new raster layer with your move tool place the green gingerbread cake behind the scroll as shown above
10. Open Cake 2 do step 9 again move it on top of the green cake show little bit of the green cake as shown above
12. Open Gingerbread House 2 go to Image>Resize 25% now go to Edit>Copy now go above the scroll go to Edit>Paste into new raster layer lay the house in front of the gingerbread cake as shown above
13.Open Gingerbread House 1 step 12 again but this time lay it on the left side of the scroll as shown above
14.Open Cupcake 1 go to Image>Resize 20% then go to Edit>Copy now go to your images go to Edit>Paste into new raster layer with your move tool place cupcake on the right side of the scroll in front of the gingerbread house 2 as shown above
15. Open Cupcake 2 do step 14 again add it as shown above
16. Open Cookie Board, Gingerbread 1 & 2 take both your gingerbread Cookies go to Image>Resize 20% then go to Image>Free Rotate Left 15% then go to Edit>Copy (adding them to your cookie board) add both them go to Layers>Duplicate as shown I add 6 gingerbread cookies both styles then go to Layers>Merge>Merge Visible then take the Cookie board go to Image>Resize 35% then go to your 3d Effects>Geometric Effects>Perspective Horizontal Effect> 35 Distortion transparent click okay then go to Image>Free Rotate Left 15 click okay now go to Edit>Copy now go to the top image layers go to Edit>Paste into new raster layer with your move tool move the cookie board in gumdrop hand as shown above once in place go to Layers>Duplicate move the duplicate beneath gumdrop then go to the top duplicate of the cookie board and erase a little right where the thumb at as if he holding the board of gingerbread cookies
17. Open Cookie 2 go to Image>Resize 20% then go to Edit>Copy go top image layers go to Edit>Paste into new raster layer with your move tool place the cookies in front of the scroll as shown above
18. Open Cookie 2 go to Image>Resize 20% then go to Image>Mirror then go down to the scroll go to Edit>Paste into new raster layer with your move tool place the cookie a little behind the gingerbread house showing only one cookie with cookies 2
19. Open Candycane 5 (or your choice) Go to Image>Resize 20% then go to Edit>Copy go to the top image layers go to Edit>Paste into new raster layer with your move tool place the candycanes into the shelf once in place go to Layers>Duplicate move the other one as shown above
20. Open Timer go to Image>Resize 20% then again at 70% then go to Edit>Copy now go down beneath the gumdrop go to Edit>Paste into new raster layer with your move tool place it as shown above
21. Open Rolling Pin go to Image>Free Rotate Left 15% then go to Image>Resize 20% then go to Edit>Copy now go down beneath the gumdrop go to Edit>Paste into new raster layer with your move tool place it into his other hand it will fit into place
22. Go to the cupcake and move it above the rolling pin
23. Open Books 1 go to Image>Resize 20% now go to Edit>Copy now go down beneath the gumdrop poser go to Edit>Paste into new raster layer with your move tool move the books to hide the frame as shown above
24. Open Books B4 go to Image>Resize 20% then go to Edit>Copy now go down to the brown shelf box go to Edit>Paste into new raster layer with your move tool place the books beneath the candy canes next to the gingerbread house as shown above
25. Open Snow go to Windows>Duplicate close the original then open Paper 7 add it to your foreground pattern 45 angle, 25 scale click okay now go to the snow go to Selections>Select all>Float then go to Layers>Add new raster layer click on the paint can and paint the holly paper into the marching ants of the new raster layer then go to Selections>Select None then go to Layers>Merge>Merge Visible then go to Image>Resize 80% then go to Edit>Copy now go to the frame layer go to Edit>Paste into new raster layer with your move tool place the holly element we made underneath everything as if it is table clothing
26.Open Gingerbread 4 go to Image>Resize 25% now go to Edit>Copy now go to the top image layers go to Edit>Paste into new raster layer with your move tool place it on the right side it cover the holly
27. Open Gingerbread 3 do step 26 again this time place it on the left side
28.
Open Bow Ribbon 1 & 2 go to Image>Rotate Right then go to
Image>Resize 20% then go Edit>Copy now go down to the frame go to
Edit>Paste into new raster layer with the green one add to the green
mitten and the red bow ribbon to the red mitten as if they are hook on
the shelf by the two ribbons holding the mittens up on the wall
29. Open Gingerbread Stocking 2 (or 1) go to Image>Resize 45% now go to Edit>Copy now go to the frame go to Edit>Paste into new raster layer with your move tool place it on the upper top left corner as shown above
30. Open Holly go to Image>Resize 20% then go to Edit>Copy go to the top image layers go to Edit>Paste into new raster layer with your move tool place it on the stocking as shown above
31. Open Gingerbread 8 (or your choice) go to Image>Resize 20% then go to Edit>Copy now go to the frame go to Edit>Paste into new raster layer with your move tool place the head of the gingerbread into the stocking
32. Go to Layers>Merge>Merge Visible
33. Add copyright as shown below
© TinkersBoo
www.PicsForDesign.com
Add your copyright license like mine is #0520
34. Add your name
Font Santa's Sleigh
Color #b32929
35. Go to Layers>Merge>Merge Visible
36. Crop the tag out of the extra transparent image (optional)
37. Go to File save as PNG format this completes this tutorial may you enjoy my designs and products thanks for stopping by look new tutorials come soon and Merry Christmas may you enjoy baking goodies with my scrap booking designs
Hugs Tinkers Boo
written Dec 12th, 2021
No comments:
Post a Comment