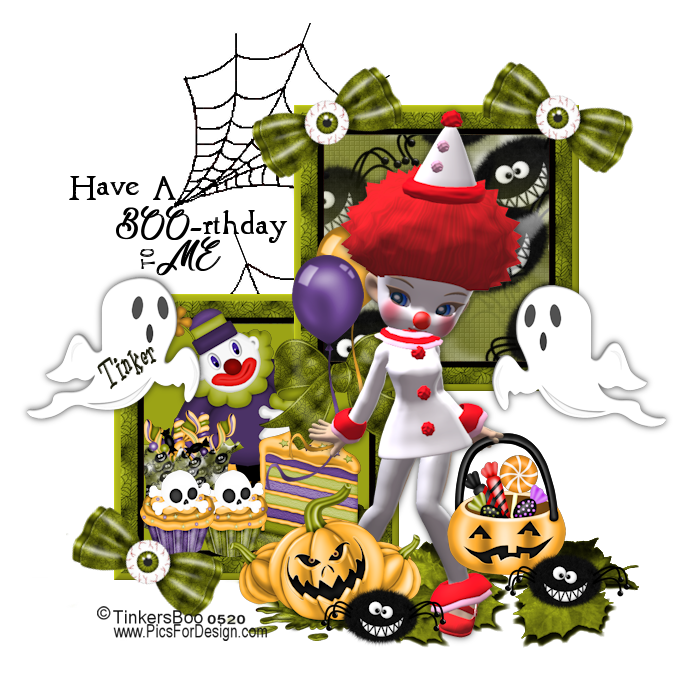
Have a Boo-rthday to Me Tutorial
Supplies Need
Halloween Kit HERE
1. Open psp program go to File new size 700 x 700 transparent image
2.
Open Frame 3 go to Image>Resize 55% now go to Edit>Copy now go to
the transparent image go to Edit>Paste into new raster layer with
your move tool place the frame down bottom left side then go to
Layers>Duplicate place the frame on the right side, you want the corners to make a small box to connect them together
Now you can use the frame 1-3 your choice
3.
Add this green color #9ba316 into the foreground then go down beneath
both frames and paint the green into the inner frames of both
4. Open Cake 3 go to Image>Resize 35% now go to Edit>Copy now stay on the green color we paint and go to Edit>Paste into new raster layer with your move tool move the cake into the inner frame on the right side as shown above
Depending which Frame you use is the cake you want 1-3
5. Open Candy B Bag go to Image>Resize 55% now go to Edit>Copy now go to your images go to Edit>Paste into new raster layer with your move tool place the spider bag into the frame on the left side as shown above
6. Open Clown Box go to Image>Resize 55% now go to Edit>Copy now go down beneath the cake layer and go to Edit>Paste into new raster layer with your move tool place the clown kinda between the cake and the candy bag
7. We going to erase a little add layers with the elements follow the steps below
A. Take the clown box go to Layers>Duplicate we want to move it above the lower frame then erase a little of the clown box that on the bottom of the frame
B. Take the Cake go to Layers>Duplicate we want to move it above the clown box above the frame then erase the cake plate that on the frame
C. Take the Candy bag go to Layers>Duplicate we want to move the bag above the clown box the frame and erase a little of the bag that on the frame
8. Open Cupcake 1 & 2 go to Image>Resize 20% each then go to Edit>Copy now go to your images go to the cake layer that above the frame go to Edit>Paste into new raster layer with your move tool place both cupcakes on the lower frame as shown above
9. Open Eye Bow 1 go to Image>Resize 35% now go to Image>Free Rotate 25 click okay now go to Edit>Copy now go to the top image layers go to Edit>Paste into new raster layer with your move tool move the eye bow down on the lower left bottom corner then go to Layers>Duplicate and move it to the upper top right corner then go to Layers>Duplicate Image>Mirror and move the 3rd eye bow on the upper top frame right side as shown above
10. Open Bow 1 go to Image>Resize 35% now go to Edit>Copy now go to the top image layers go to Edit>Paste into new raster layer with your move tool move the green bow on top of the top frame lower left side as shown above (hides the lower frame making it look like it connect)
Depending which frame you use the eye bow and the bow comes in the other colors too
11. Open Clown pose 5 go to Image>Resize 70% now go to Edit>Copy now go to the top image layers go to Edit>Paste into new raster layer with your move tool place Cookie Clown as shown above once in place go to your 3d Effects>Drop Shadow of 0 0 70 10 #090909 color click okay
12. Open Candy Pumpkin go to Image>Resize 35% now go to Edit>Copy now go above Cookie go to Edit>Paste into new raster layer with your move tool careful move the candy pumpkin into her hand once in place go to Layers>Duplicate, then with your move tool move the duplicate beneath Cookie then go to the top candy pumpkin and with the small eraser erase the handle right where her thumb is at as if she is holding the pumpkin of candy in her hand
13. Open Pumpkins 1 go to Image>Resize 35% now go to Edit>Copy now go to the top image layers go to Edit>Paste into new raster layer with your move tool place the pumpkins down in front of Cookie foot and the lower frame as shown above
14. Open the Leaves 1 go to Edit>Copy now go down beneath Cookie Clown and go to Edit>Paste into new raster layer with your move tool place the leaves beneath Cookie foot then erase the leaves on the left side of the eye bow, frame, and pumpkins
15. Open Paper 6 add it to your foreground pattern 0 angle, 100 scales click okay now go down to the green upper right color layer then go to Layers>Add new raster then click on your paint brush and paint the spider paper into the inner frame
16. Open Ghost 2 go to Image>Resize 35% now go to Edit>Copy now go to the top image layers go to Edit>Paste into new raster layer with your move tool place it on the left side as shown above then add an drop shadow (same as before) then go to Layers>Duplicate, Image>Mirror and move the ghost on the other side as shown above
17. Right click my word art below for this tutorial go to Image>Resize 70% then go to Edit>Copy then go to the top image layers go to Edit>Paste into new raster layer with your move tool place the word art above the lower frame as shown above
18. Open Balloon 1 & 3 go to Image>Resize 55% now go to Edit>Copy then go beneath Cookie Clown and go to Edit>Paste into new raster layer with your move tool place them behind the other hand as shown above
19. Open the Spider Web go to Image>Flip Vertical Image>Mirror then go to Edit>Copy now go down to the transparent image go to Edit>Paste into Selection with your move tool move the spider web up to the word art (optional) once in set place go to Selections>Select None (keep the spider web open)
20. Take the element go to Image>Mirror then go to Edit>Copy then go to Edit>Paste into Selection and move the spider web line up with the Boo once in place click your mouse or go to Selections>Select None (optional)
21. Open Spider 1 go to Image>Resize 25% now go to
Edit>Copy now go to the top image layers go to Edit>Paste into new
raster layer with your move tool move the spider down on the grass on
the right side then go to Layers>Duplicate and move the spider next
to the pumpkin as shown above
22. Add copyright as shown below
© TinkersBoo
www.PicsForDesign.com
Add copyright license mine is # 0520
23. Add your name if you wish I use the following below
Font Bookworm
Color #151605
24. Go to Layers>Merge>Merge Visible
25. Go to File save as PNG format this completes this tutorial
Hugs Tinkers Boo
written Oct 12th, 2021


No comments:
Post a Comment